format_textdirection_l_to_r Introducing
The goal of this bundle is to allow you to associate media with several entities, and manage them.
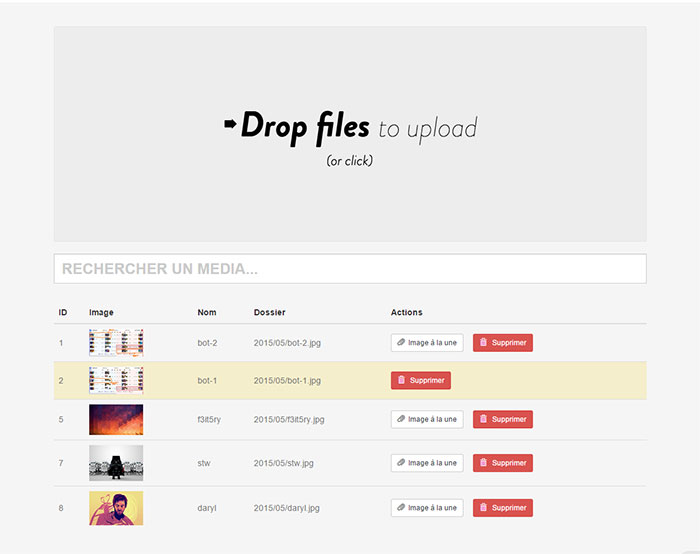
- Very easy to initialize and configure. Add your media and retrieves them very simply.
- Use a drag and drop system by Dropzone.js.
- Add an iframe uploader or if you have write articles by example, you can add a wysiwyg(Tinymce) which integrates a media uploader.
- This MediaBundle integrates a Resize media system. You can configure different size for your images. The bundle use Imagine library.
format_textdirection_l_to_r Configuration
Add package to your composer.json :
"require": {
    "mykees/symfony2-media-bundle": "1.0.*@dev"
}
Add this bundle to your application's kernel :
$bundles = array(
        ...
        new Mykees\MediaBundle\MykeesMediaBundle(),
);
Add routing in app/config/routing.yml :
mykees_media:
    resource: "@MykeesMediaBundle/Resources/config/routing.yml"
prefix: /admin/medias// YourProject/YourBundle/Entity/Post
use Mykees\MediaBundle\Interfaces\Mediable;
use Mykees\MediaBundle\Traits\MediableTrait;
/**
* Post
*
* @ORM\Table()
* @ORM\Entity()
* @ORM\HasLifecycleCallbacks
*/
class Post implements Mediable
{
use MediableTrait;
.....
}php app/console doctrine:schema:update --forcephp app/console assets:installformat_textdirection_l_to_r Uploader
Add editor_uploader twig extension in javascript block in your page and pass your entity object to the extension :
// src/YourProject/YourBundle/Resources/views/Blog/edit.html.php

{% extends 'base.html.twig' %}

{% block body %}
.....
{% endblock %}


{% block javascripts %}
    {{ parent() }}
    {{ editor_uploader(post) }}
{% endblock %}
to finish add class tinymce_init to your textarea.
Use iframe_uploader twig extension in your page and pass your entity object to the extension:
// src/YourProject/YourBundle/Resources/views/Blog/edit.html.php

{{ iframe_uploader(post) }}When you upload a media, it's uploaded automatically in the following folders (from web folder) :
"img/current_month/current_year/your_media.jpg"
This path can be configured soon.
format_textdirection_l_to_r Usage
In your controller, to retrieve your media you can use some useful functions :
// Find all media for a Mediable object
$this->get('mk.media.manager')->findMedias($object);
// Find all media for an array of Mediable objects
$this->get('mk.media.manager')->findMediasByArrayObject($arrayObject);// Find all media for a model name
$medias = $this->get('mk.media.manager')->findMediasByModel($model_name);// Find all media for a model name and a model id
$medias = $this->get('mk.media.manager')->findMediasByModelAndId($model_name, $model_id);By example, if you have recovered your media with an entity Post or array of entities, you can display them like that :
{% for media in post.getMedias %}

    {% if media.file != post.thumb.file %}

        <img src="{{ asset('img/'~media.file) }}" alt=""/>
        {{ image(asset('img/'~media.file), 250,250) }}

    {% endif %}

{% endfor %}If you want to add a featured image, add $thumb variable in your Mediable entity:
//YourProject/YourBundle/Entity/Post

class Post implement Mediable {
    ....

    /**
    * @ORM\ManyToOne(targetEntity="Mykees\MediaBundle\Entity\Media", cascade={"persist", "remove"})
    * @ORM\JoinColumn(name="thumb_id", referencedColumnName="id")
    */
    private $thumb;
    ....

}
Don't forget to update you entity and your database :
$ php app/console doctrine:generate:entities YourProject/YourBundle/Entity/Post
$ php app/console doctrine:schema:update --force
Now in your Media Uploader you can add a featured image :)
In your view :
{% if post.thumb != null %}
    <img src="{{ asset('img/'~post.thumb.file) }}" alt=""/>
{% endif %}
format_textdirection_l_to_r Options
You can configure the allowed images formats in your app/config/config.yml :
mykees_media:
allowExtension: ['jpg','png', .....]The Symfony2-Media-Bundle use the Imagine library to resize your images.
Configure the different sizes in your app/config/config.yml :
mykees_media:
    resize:
        Post: // for Post entity
            mode: inset // you can choose inset or outbound. Look Imagine Documentation for more details
            size:
                - { width: 250, height: 250 }
                - { width: 350, height: 350 }

        Portfolio: // for Portfolio entity
            mode: inset
            size:
                - { width: 250, height: 250 }
                - { width: 350, height: 350 }
Now in you view you can retrieve your resized images with the extension image :
{{ image(asset('img/'~media.file), 250,250) }}

// With attributes
{{ image(asset('img/'~post.thumb.file), 350,350,{'class':'your-custom-class'}) }}